
MicroStrategy ONE
Attribute Element List prompts
The Attribute Element List prompt allows a user to choose from a list of attribute elements to be included in a filter or custom group. This is generally the simplest prompt for users to answer, because it offers the fewest number of answers to choose from and does not require the user to create a filtering "statement".
You define the specific attribute elements to be displayed in the prompt, by using one of the following methods:
- Selecting all elements associated with an attribute
- Creating a filter that returns a limited list of elements from one attribute
- Selecting specific attribute elements one by one
For example, your report contains the attribute Region and the metric Revenue. You want users to be able to select specific geographical regions of the country for which to see revenue data, from among only eastern U.S. regions.
You create an attribute element list prompt, which prompts the user to choose from three attribute elements in the Region attribute. Using the MicroStrategy Tutorial project data, you might use all three regions as default answers for the prompt:
- Northeast
- Mid-Atlantic
- Southeast
When you apply this prompt to the report and execute the report using the default answers, the report appears as shown in the following image.
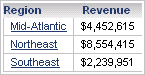
The Attribute Element List prompt is the most restrictive, allowing users to choose from the fewest number of attribute elements to define their filter criteria. The Hierarchy Qualification prompt allows users to select from the widest number of attribute elements when they are choosing prompt answers to define their filtering criteria. The Attribute Qualification prompt is more restrictive than the Hierarchy Qualification prompt, but less restrictive than the Attribute Element List prompt.
To create an Attribute Element List prompt
- In MicroStrategy Web, on the Home page, click New Prompt.
- Click Attribute Element List.
To determine the attribute whose elements the user will be able to choose from
The prompt will display the related attribute elements for users to select their filter criteria from.
On the Definition tab, click Select Attribute. Select the attribute whose elements are displayed in the prompt and click OK.
To define the specific elements the user will be able to choose from
Choose one of the following options:
- List all elements (no restriction): This option displays all of the attribute's elements to the user when he is answering the prompt.
- Use a pre-defined list of elements: This option lets you select specific attribute elements to display to the user.
- Click Add, select the elements, then click OK.
- To delete an element from the list, select the element, then click Remove.
- To remove all the elements from the list, click Clear.
- Use a filter to reduce the number of elements: This option is useful for attributes with a large number of elements, such as Customer or Employee. You can create a filter that returns a specific set of customers, for example, the top 100 customers this month.
Click Select Filter, select the filter or specify the name of the filter, then click OK.
To specify a title and instructions
For considerations when determining a title and description, see Components of a prompt.
- On the General tab, type a Title, which is used as the default object name when you save the prompt, although you can change it.
- Type text in the Instructions field, which is displayed when the prompt is run during report execution.
To restrict the number of prompt answers
- You can specify whether the user is required to answer the prompt before running the report. To require users to answer the prompt, select the Prompt Answer is Required check box.
- Set the maximum and/or minimum number of prompt answers allowed, if desired. Select the Minimum number of answers and/or the Maximum number of answers check boxes, and enter the numbers in the fields.
To allow personal answers
Personal answers allow a user to save prompt answers for this prompt, and then reuse the answers on any report that this prompt is used on. For more information on personal answers, and how they can be used, see Components of a prompt.
To determine whether personal answers can be saved for this prompt, select one of the following options from the Personal answers allowed drop-down list:
- None: No personal answers can be saved. Every time a user sees the prompt, he must answer it manually (if it is required) or ignore it.
- Single: Only one personal answer can be saved for this prompt. When the prompt is used again (on this report or a different one), the personal answer is displayed. A user can keep the personal answer, or add or delete selections. He can save his changes as a new personal answer, but only one personal answer can be saved for the prompt.
- Multiple: Multiple personal answers can be named and saved, allowing different answers for the same prompt. When the prompt is used again (on this report or a different one), the personal answers are available. The user can select one of them, or answer the prompt manually.
To specify the layout and display style of the prompt
-
On the Style tab, you can determine the presentation style used to display the prompt to the user. The default is Shopping Cart. From the Display style drop-down list, select one of the following:
- Radio Button: This prompt lets users select an attribute element option by selecting a radio button.
- Check Box: This prompt lets users specify attribute elements by selecting check boxes.
- Pull Down: This prompt lets users select an answer from a drop-down list.
- List: This prompt lets users select prompt answers from a list.
- Shopping Cart: This prompt lets users add attribute elements to a list of selected attribute elements.
- Calendar: This prompt lets users answer the prompt by selecting a date on a calendar. This option is available if a date/time attribute such as Month of Year is selected.
- Barcode Reader: This prompt lets users answer the prompt by scanning or typing a bar code.
-
Geo Location: This prompt lets users filter the attribute element list based on their current geographical location.
Styles for prompts for mobile devices, including the Calendar, Barcode Reader, and Geo Location display styles, display when the prompt is viewed on a mobile device with MicroStrategy Mobile. Certain styles are available for specific types of Attribute Element List prompts. For more information on displaying prompts for mobile devices, see the Allowing users to filter data: prompts section of the MicroStrategy Mobile Administration Help.
-
To ensure that the prompt's text fields and options are a fixed size, select the Fixed textbox width and/or Fixed textbox height check boxes, and specify the size of the prompt's text fields and options in the fields.
Specifying the size of the textbox can be beneficial when users answer prompts on a smaller screen of a mobile device.
-
To determine how prompt options are arranged, from the Orientation drop-down list, select Vertical or Horizontal.
To determine the number of prompt answers displayed in a row or column (depending on alignment), select the Items per column/row check box and type a number in the field.
-
You can determine whether to allow users to use a search box to locate prompt answers. Searching for objects allows analysts to quickly locate specific objects to use to answer the prompt. From the Show search box drop-down list, select one of the following options:
To display the search box, select True.
To not display a search box, select False.
-
To require using the search box to locate prompt answers, select the Make search required check box.
-
If you are using the Shopping Cart display style, you can select the Use folder structure check box to display the prompt choices in a folder structure. This option, available for search objects, is useful when the same object with the same name is saved in multiple folders.
Select the Do not show empty folders check box if you do not want the search result to display empty folders.
To allow users to navigate above the root folder when searching, select the Allow navigation above search root check box.
-
For the Barcode Reader prompt style, to specify the attribute form used to look up item barcodes, select an attribute form from the Barcode mapping attribute form drop-down list.
-
For the Geo Location prompt style, from the Select location mapping level drop-down list, select the level at which you wish to filter elements in the attribute. For example, select City to filter the attribute elements by the current city in which the mobile device is located.
-
To select the attribute whose elements you want to filter, click Select Attribute, browse to and select the attribute, and then click OK.
To save your prompt
Click Save As, navigate to the folder where you want to save the prompt, type a Name and Description for the prompt, and click OK. Your new prompt is saved.
You can now add your new prompt to a report, metric, or filter. For a table showing how to add each prompt type to a report, metric, or filter, see Reports: Adding prompts to a report, metric, or filter.
You can also set a default prompt answer, which allows the user to complete report execution quickly, as they do not need to answer the prompt but can simply run the report using the default answer. For steps to specify a default prompt answer, see Components of a prompt.