
View and Edit Log Configuration Settings
Starting in Strategy (September 2026), you can reset all log configuration settings with one click. You can also set automatic expiration dates for logs. After the expiration date and time is reached, log configuration entries are no longer available.
Starting in Strategy (July 2026), logs not available out-of-the-box can not be saved to DSSErrors.log to prevent extra entries that can cause high cloud ingestion and storage costs. Logs not available out-of-the-box have a default expiration date of seven days after enabling the log. Once the log expires, they will not be logged in the defined file.
This expiration behavior only applies to newly added or modified logs.
Check out the video below to learn more!
Configure Diagnostic Logs
- Open the Workstation window.
- In the Navigation pane, click Environments.
- Right-click a connected environment and choose Properties.
-
In the left pane, click Log Configuration.
-
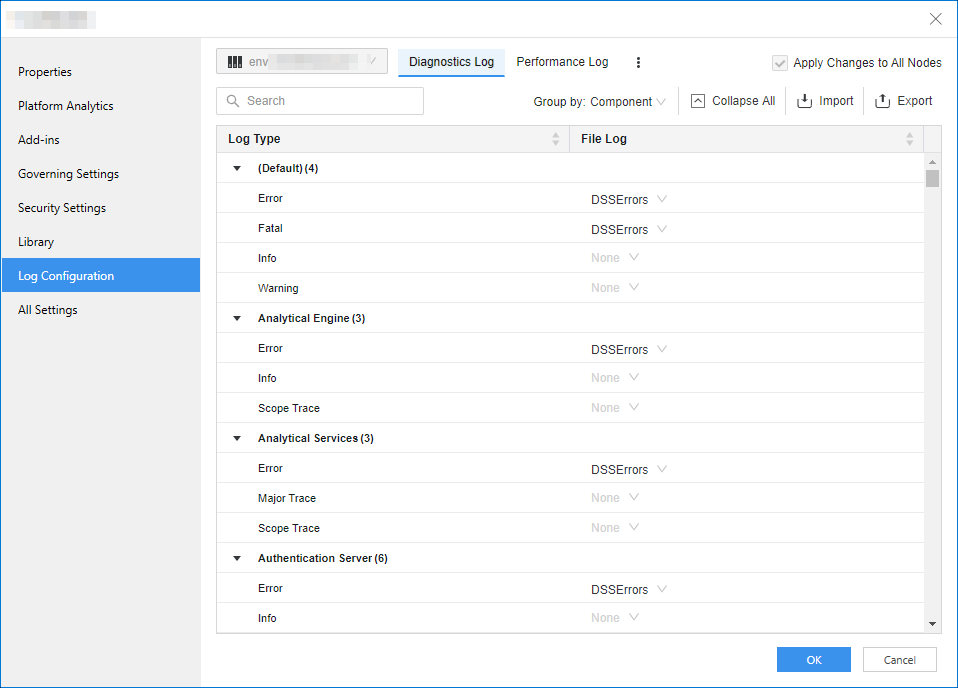
Select the Diagnostics Log tab.
-
By default, the logs are grouped by component, as shown above. To change the display, from the Group By drop-down list, select File Log.
-
If you have multiple nodes in this environment, do one of the following:
-
To apply the changes to all nodes, select the Apply Changes to all Nodes check box.
-
To specify the node, select it from the Apply Changes to all Nodes drop-down list.
-
-
In the File Log column, choose the Log Destination for each one of the Log Type Entries.
-
If the log destination does not exist, you can add it. In the Log Destination drop-down list, click New Log Destination. Specify the File Name and Max File Size. Click OK.
-
-
To export all the current settings, click Export.
-
Click OK.
Configure Performance Logs
- Open the Workstation window.
- In the Navigation pane, click Environments.
- Right-click a connected environment and choose Properties.
- In the Navigation pane, click Environment Settings.
- In the left pane, click Log Configuration.
-
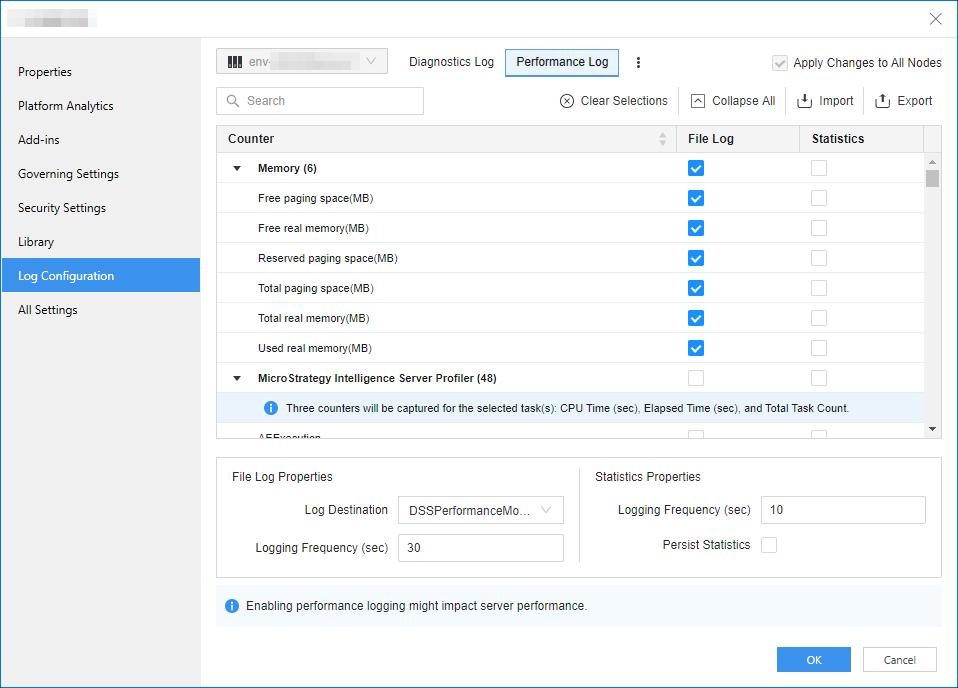
Select the Performance Log tab.
-
If you have multiple nodes in this environment, do one of the following:
-
To apply the changes to all nodes, select the Apply Changes to all Nodes check box.
-
To specify the node, select it from the Apply Changes to all Nodes drop-down list.
-
-
In the File Log column, select all the counters to log to a file.
-
In the File Log Properties area:
-
Choose the Log Destination from the available log destinations.
-
Type the Logging Frequency.
-
- In the Statistics column, select all the counters to log statistics.
- In the Statistics Properties area:
- Enter the Logging Frequency.
- Select whether to Persist Statistics.
-
To export all the current settings, click Export.
-
Click OK.
Manage Log File Destinations
You can view, delete and modify file log destinations.
- Open the Workstation window.
- In the Navigation pane, click Environments.
- Right-click a connected environment and choose Properties.
- In the Navigation pane, click Environment Settings.
- In the left pane, click Log Configuration.
-
To the right of the Performance Log tab, click More
 . and choose Manage File Log Destinations.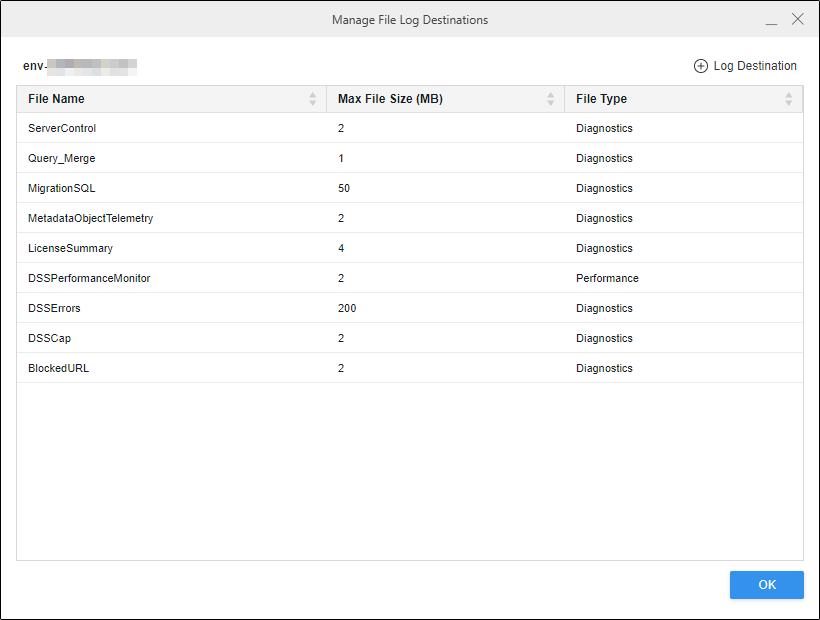
-
You can change the Max File Size for any file log destination.
-
To add a new file log destination:
-
Click
 Log Destination.
 -
Specify the File Name and Max File Size.
-
Select the File Type from the drop-down list.
-
Click OK.
-
-
To remove a file log destination, hover your cursor over the entry and click Delete
 .
. -
Click
Log Destination to add a new file log to the list of entries. -
Click OK to save the file log destination changes.
-
Click OK.
Reset Log Configuration
One-click reset is only available if you are using a Managed Cloud Enterprise or Managed Cloud Standard environment.
One-Click Reset allows administrators to restore all log configuration options to their default settings in a single action. A confirmation dialog is shown before the reset is applied to prevent accidental changes. A confirmation dialog displays before the reset applies to prevent accidental changes. The reset is useful when multiple log settings have been modified over time and the administrator wants to return to a clean, known-good baseline quickly.
If you reset log configuration, all custom log settings, including any configured expiry dates, are permanently removed. This action can not be undone.
- Open the Workstation window.
- In the Navigation pane, click Environments.
- Right-click a connected environment and choose Properties.
-
In the left pane, click Log Configuration.
-
Select the Diagnostics Log tab.
-
In the top navigation, click Reset.
-
Review the confirmation dialog and click Reset.
-
Click Save.
All log entries return to their out-of-the-box default. Any configured dates are removed.
Log Auto Expiration
Auto expiration is only available if you are using a Managed Cloud Enterprise or Managed Cloud Standard environment.
Auto expiration allows administrators to set a specific date and time on any log configuration entry to expire. After the expiry date and time is reached, the log configuration is disabled.
To enable any log not available out-of-the-box, you must select the file name and an expiry date. Logs not available out-of-the-box have a default expiration of 7 days after enabling the log. You can change the expiry date as needed, up to a maximum of 30 days. The maximum expiration limit can be configured using a environment variable set to a desired value.
To resume logging after expiration, you must manually re-enable the log and set a new expiry date. This is useful when temporarily increasing log verbosity for troubleshooting, the setting rolls back on its own without manual intervention, which prevents forgotten high-verbosity logs from consuming storage or impact performance.
Configure Auto Expiration
- Open the Workstation window.
- In the Navigation pane, click Environments.
- Right-click a connected environment and choose Properties.
-
In the left pane, click Log Configuration.
-
Select the Diagnostics Log tab.
-
Find the log you want to add an expiration date to.
-
Click the value in the Expiry Date column and choose a date and time.
-
Click Save.