Strategy One
Connect to SharePoint and OneDrive
Create an OAuth App in Azure
-
Sign in to
https://portal.azure.com/#home. -
Go to App registrations and click New registration.
-
Type an application Name.
-
Expand the Supported account types drop-down list and choose the account type that can use the application.
-
Click Register.
-
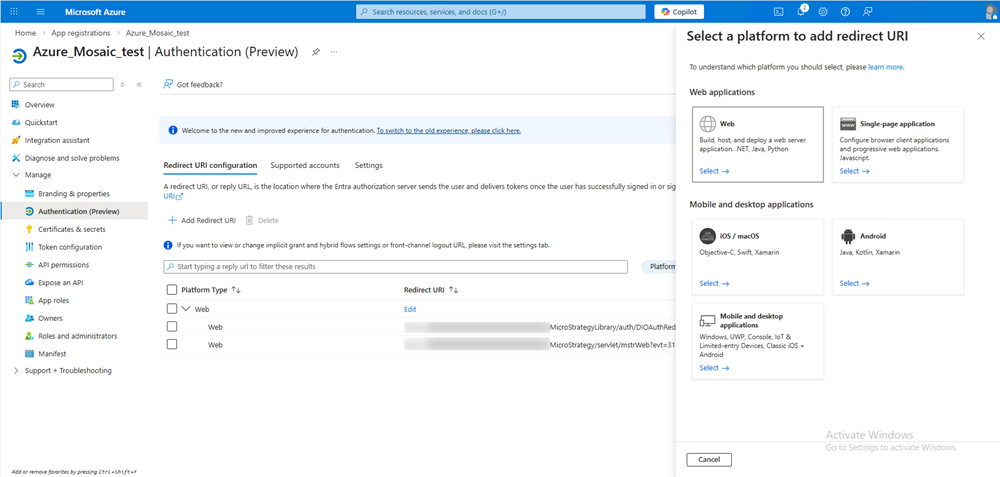
In the left navigation, expand Manage and choose Authentication (Preview).
-
Click Redirect URI configuration.
-
In Web applications, choose Web.
-
In Add Redirect URI, add a Callback URL for Web, Library, or Workstation using the following formats:
-
Web redirect URI:
https://<servername>/MicroStrategy/servlet/mstrWeb?evt=3172 -
Library redirect URI:
https://<servername>/MicroStrategyLibrary/auth/DIOAuthRedirect.jsp -
Workstation redirect URI:
http://127.0.0.1
-
-
Click Configure.
-
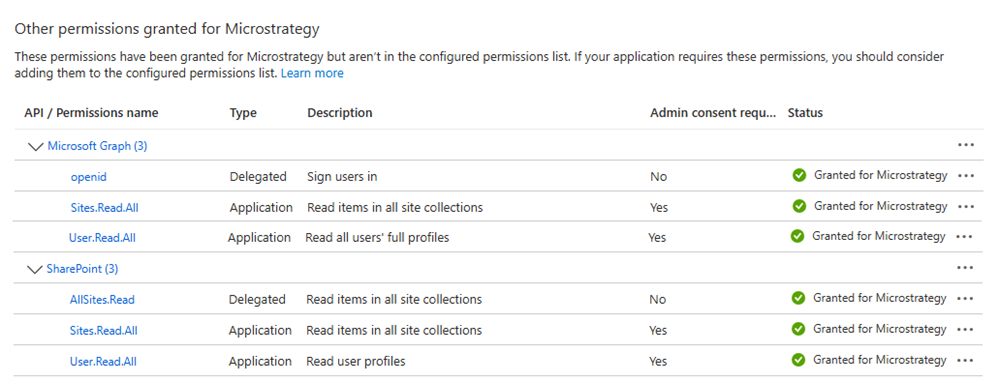
In the left navigation, expand Manage and choose API permissions.
-
Click Add a permission.
-
Choose Microsoft Graph and Delegated permissions.
-
Select the checkbox next to the following permissions:
-
openid -
Sites.Read.All -
User.Read.All
-
-
Click Add permissions.
-
Click Add a permission.
-
Choose SharePoint and Delegated permissions.
-
Select the checkbox next to the following permissions:
-
AllSites.Read -
Sites.Read.All -
User.Read.All
-
-
Click Add permissions.
-
Copy the client ID, client secret, and directory (tenant) ID. You will need these values for future steps:
-
To copy the client ID, go to Overview and copy Application (client ID).
-
To copy the directory (tenant) ID, go to Overview and copy Directory (tenant) ID.
-
To copy the client secret:
-
Expand Manage and Certificates & secrets.
-
Click New client secret.
-
Type a Description.
-
Expand the Expires drop-down list and choose a client secret expiration day.
-
Click Add.
-
Click Copy to Clipboard next to the secret Value.
-
-
Connect to SharePoint and OneDrive Data Source
Prerequisites
You must have the Configure security settings and Create and edit database instances and connections privileges.
Create a New Authentication Service in Workstation
For more information on creating identity and access management (IAM) objects, see Manage OAuth Enterprise Security with Identity and Access Management (IAM) Objects.
-
Open the Workstation window.
-
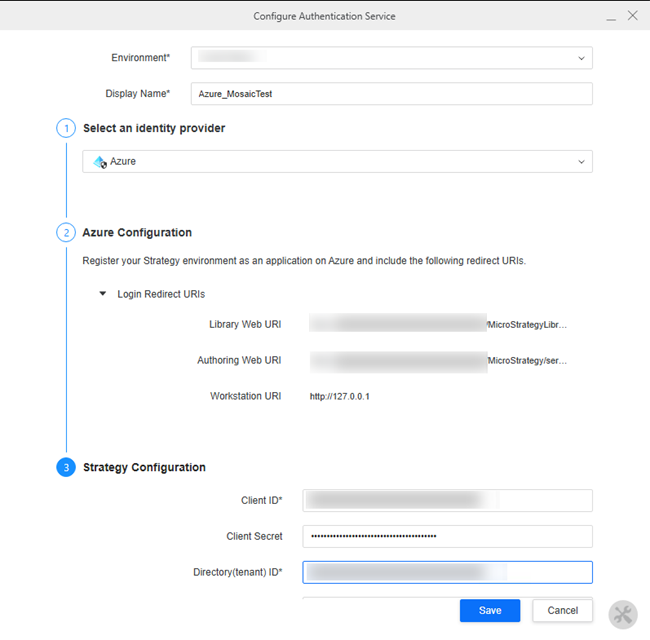
In the Navigation pane, click
 , next to Enterprise Security.
 -
Choose Gateway Authorization and click Next.
-
Type a Display Name.
-
Expand the Select an identity provider drop-down list, choose Azure.
-
In Strategy Configuration, enter the Client ID, Client Secret, and Directory (tenant) ID you copied in Create an OAuth Application in Salesforce.
-
Click Save.
Connect to SharePoint and OneDrive in Mosaic Studio
- Create a Mosaic model or right-click an existing Mosaic model and choose Edit.
- In the Sources tab, click Add File Storage.
-
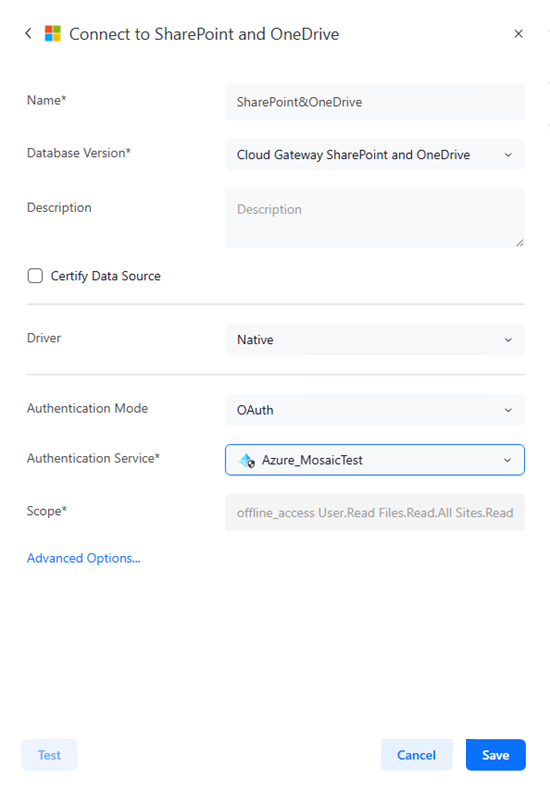
Click SharePoint and OneDrive.
-
Type a Name for the data source.
-
Expand the Authentication Service drop-down list and choose the authentication service you created in Create a New Authentication Service in Workstation.
-
Optionally click Test.
-
If the connection is successful, click Save.
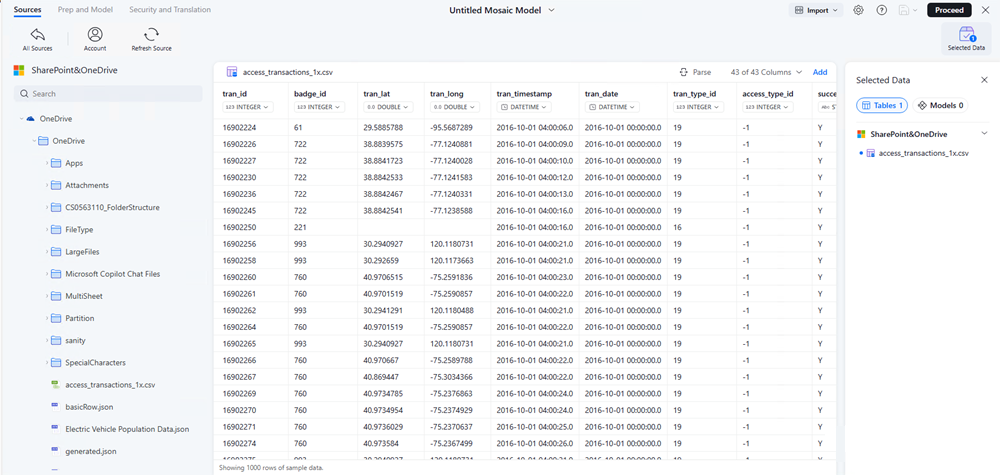
Import Data
-
Click your SharePoint and OneDrive source and enter your Microsoft Login.
-
Expand OneDrive or SharePoint and click the files you want to import.
-
View the sample data and adjust your column types.
-
Click Add.
-
Click Proceed.
-
View and choose suggestions, view object logical relationships, or automatically create attributes and metrics.
-
Click Save, Save as, or Publish.
-
If you Saveor Save as your Mosaic model:
-
Type a Name and Description.
-
Choose a Save in folder location.
-
Optionally, select the check box next to Certify Mosaic Model.
-