
Configure and Export Content to Google Sheets
Starting in Strategy (August 2026), you can export reports and dashboards to Google Sheets in a Google Drive folder. To use this functionality, Enable the Google Picker API and Create an API Key and enter your API key in Create Authorization Configuration.
Starting in Strategy One (March 2026), you can export reports and dashboards into Google Sheets. To utilize this functionality, administrators and users must perform the following:
-
An administrator must configure Google Cloud and Strategy.
-
Each user must authorize access to their Google account the first time they use the feature.
-
Each user must have the Export to Google Sheets privilege.
For more information on editing user privileges, see Edit Existing Users and Groups.
See the following sections for more information on configuring Google Cloud and Strategy for Google Sheets export.
Prerequisite: Configure Samesite Cookies to Lax or None
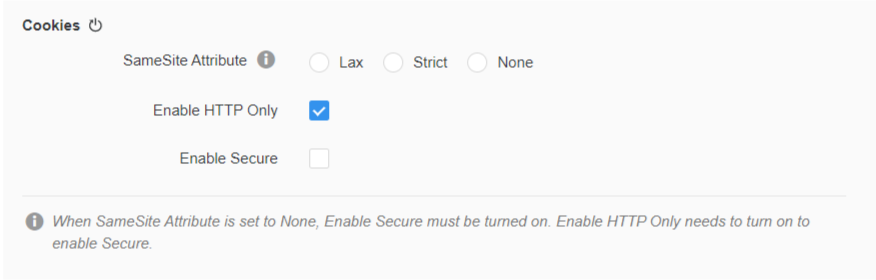
To configure your samesite cookies to Lax or None, choose Lax or None in the SameSite Attribute field:
-
In Workstation, Connect to the Library environment with an admin user.
-
Right-click the environment and choose Properties.
-
In the left pane, click Library and scroll down to the Cookies section.
-
Based on your requirements, select the appropriate SameSite attribute and click OK. The SameSite attribute is unselected by default.
-
Restart the Library server.
Learn more about the other settings on this dialog in View and Edit Library Administration Settings
Create a Google Cloud Platform Project
-
Sign in to Google Cloud.
-
In the left navigation pane, click IAM and Admin and Create a project.
-
Type a Project name, choose an Organization, and select a Location.
-
Click Create.
For more information on creating a Google Cloud project, see Create a Google Cloud project.
Enable the Google Drive
-
In the Google Cloud left navigation pane, click APIs and Services and Enabled APIs and services.
-
Click Enable APIs and Services.
-
In the Search, type "
Google Drive API" and pressEnter. -
Select Google Drive API and click Enable.
Enable the Google Picker API and Create an API Key
If you are using the option available starting in Strategy (August 2026) to define a default Google Drive folder, use the following steps to enable the Google Picker API and create an API key:
-
In the Google Cloud left navigation pane, click APIs and Services and Enabled APIs and services.
-
Click Enable APIs and Services.
-
In the Search, type "
Google Picker API" and pressEnter. -
Select Google Picker API and click Enable.
-
In the Google Cloud left navigation pane, click APIs and Services and Credentials.
-
Click Create credentials and choose API key.
-
Type a Name for the key.
-
Expand the Select API restrictions drop-down list and choose Google Picker API.
-
Click Create.
-
Note the value in Your API Key as it will be used in later steps.
Configure the OAuth Consent Screen
-
In the Google Cloud left navigation pane, click APIs and Services and OAuth consent screen.
-
Click Get started and follow the setup:
-
Choose an Audience.
If you choose Internal, your app is limited to Google Workspace users within your organization.
-
Type an App name, User support email, and Email address.
-
Click Next.
-
Review the user data policy and select I agree to the Google API Services: User Data Policy.
-
Click Continue and Create.
-
-
The key application information displays on the Branding page. Go to the Clients page.
-
Click Create Client and follow the setup:
-
In Application type, choose Web application.
-
Type a Name.
-
Type temporary required URIs. You will refine the redirect URIs in the next section.
-
Click Create.
-
To save the Client ID and Client Secret, click Download JSON.
The Client ID and Client Secret will be used in future steps.
-
Configure Redirect URIs
-
On the Google Cloud Clients page, find the OAuth client you just created and click Edit.
-
In Authorized redirect URIs, click Add URI.
To create your URI, for example, if your Library URL is
https://<your_envrionment>/StrategyLibrary, add/auth/DIOAuthRedirect.jspto the end of the URL to generate the Authorized redirect URI. The final URL will behttps://<your_envrionment>/StrategyLibrary/auth/DIOAuthRedirect.jsp.You can add multiple URIs to support multiple Library instances or applications.
-
Click Save.
Create Authorization Configuration
-
Connect to your Strategy environment in Workstation.
-
In the Navigation pane, click
 , next to Enterprise Security.
 -
In Type, choose Gateway Authorization.
-
Click Next.
-
Type a Display Name.
-
In the 1. Select an identity provider drop-down list, choose Google Export.
Only one Google Export configuration is allowed per environment. If a Google Export configuration already exists, the option is not available.
-
In 2. Strategy Configuration, paste the Client ID and Client Secret you noted above.
-
If you are exporting to a specific Google Drive folder, toggle on API Key and paste the key noted in Enable the Google Picker API and Create an API Key.
If you do not have an API key and the Google Picker API enabled, exports will use the default (root) folder.
-
Click OK and ensure your Google Cloud project is set as an internal application.
-
Click Save.
Export to Google Sheets
-
-
Click
 Share and choose Export to Google Sheets.
 -
If you are choosing this option for the first time, the browser redirects you to Google's OAuth consent screen:
-
Sign in with your Google account.
-
Click Continue.
Future exports will reuse this authorization.
-
- If your report includes page-by fields, optionally define Export Settings:
- Choose whether to Expand all Page-By fields.
- If the page-by fields are expanded, choose whether each page-by field exports to a separate worksheet or all fields export to one worksheet.
- Select or clear the Export Page-By information check box to include or exclude details about the Page-By value in the spreadsheet.
-
Starting in Strategy (August 2026), expand the Destination drop-down list and choose from the following options to send the export to:
-
Default folder: The assigned default Google Driver folder. To view the default Google Drive folder, click View default and the folder path displays.
To define a new default folder, choose Select folder, select your folder, and click Set as default.
-
Select folder: Choose an option from the selection dialog and click Select.
-
My Drive (root folder): Exports to the root of your Google Drive.
-
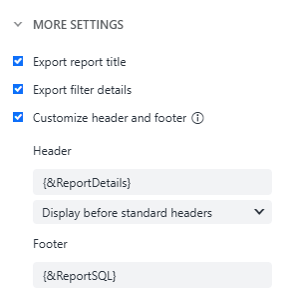
- In More Settings, select the check box next to additional formatting settings including the following:
- Export report title
- Export filter details
Customize header and footer. If you select this option, type a value below Header and choose a formatting option from the drop-down list. Then, type a value below Footer.
Starting in Strategy (July 2026), to combine multiple values with plain text under Header or Footer, type
{and a drop-down list with the following predefined dynamic text boxes displays:Execution Data
Execution Time
Filter Details
Page-by
Project Name
Prompt Details
Prompt N
Report Description
User Name
View Filter Details
Report SQL
Report Details
-
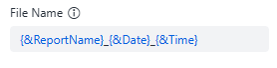
Starting in Strategy (July 2026), if File Name is set to Default, the exported report name is the Strategy report name. You can also customize this name using dynamic text.
-
The export completes and a notification displays at the bottom of your screen. Click the URL link to open the Google Sheets file.
Exported files are created in the root folder of your Google Drive (the "My Drive" root of your Google account). Updating the target folder is not yet supported.
Update or Remove the Linked Google Account
To update the Google account linked to your Strategy user or to de-authorize it, use the following steps:
-
Go to Google (for example, Google Drive or any Google app).
-
Click your profile icon and choose Manage your Google Account.
-
Go to Security or Data and privacy.
-
Click Third-party apps and services.
-
Find the MicroStrategy entry (for example, MSTR Export or similar).
-
Click Remove access or Delete all connections that you have with MSTR Export.
-
The next time a user chooses Export to Google Sheets, the user will be prompted to log in with the Google OAuth consent screen.
-
Log in with the same Google account or a different Google account, as needed.