Strategy One
Create Google Cloud Storage Subscriptions
Prerequisites
You must have the Subscribe to Google Cloud Storage (GCS) privilege.
Configure IAM for Google Cloud Storage
Before users can create GCS subscriptions, an administrator must configure the GCS IAM authentication for the delivery device:
-
Create or identify a Google service account that can upload files to the target GCS location. For more information on creating a Google service account, see Service accounts overview.
-
Download the credential file of the service account. Note the credentials that are required by the GCS delivery device such as the client email, private key, token URI, and related IAM values from the service account JSON.
-
Create the IAM:
-
Open the Workstation window.
-
Click
 next to Enterprise Security.
 -
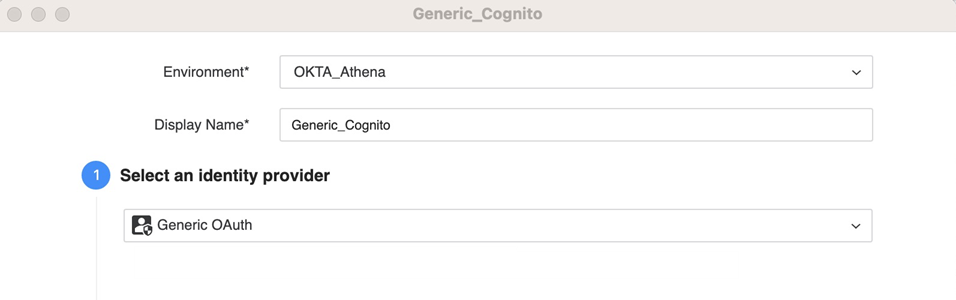
Choose the Environment in which you want to create the object.
-
Give the IAM object a Display Name.
-
Select the Generic OAuth IdP type and register the Strategy environment as an application with the provided Login Redirect URIs.
-
Copy and paste the following values from the Google credential file into the Workstation fields:
-
In Client ID, enter the value from
client_email. -
In Client Secret, enter the value from
private_key. -
In OAuthURL, enter the value from
token_uri. -
In TokenURL, enter the value from
token_uri. -
In Scope, enter
https://www.googleapis.com/auth/devstorage.read_write. -
In Additional OAuth Parameters, type
project_id=and enter the value fromproject_id.
-
-
Click Save.
-
Configure a Google Cloud Storage Device
For more information on delivery devices, see Create a Delivery Device.
-
Open the Workstation window with the Navigation pane in smart mode.
-
In the Navigation pane, click Environments.
-
Right-click an environment and choose Properties.
- In the left pane, click Subscription Delivery.
-
Click Delivery Device to view the delivery devices configured for the environment.
-
Click
 Add Delivery Device.
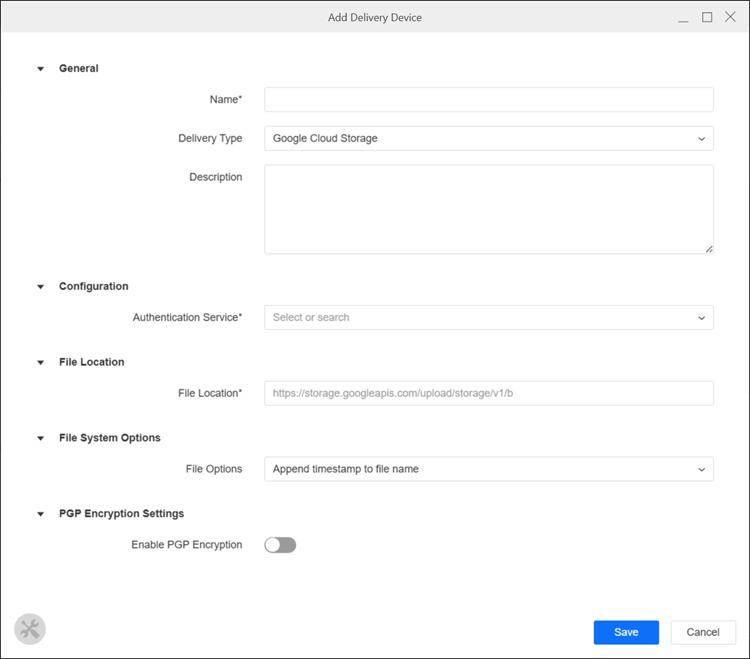
-
Expand the Delivery Type drop-down list and choose Google Cloud Storage.
-
Type a Name and optional Description.
-
In Authentication Service, choose the IAM you created above.
-
In File Location, type
https://storage.googleapis.com/upload/storage/v1/b. -
Expand the File Options drop-down list and choose Append timestamp to file name to automatically add the date and time of file creation to the end of the filename.
-
In PGP Encryption Settings, use the following optional encryption settings:
-
Enable PGP Encryption Toggle on this option to enable PGP Encryption to use a public key to ensure security and authenticity.
-
Encryption Public Key Click Upload and find the public key for PGP encryption.
You must also upload the encryption key to the user or contact subscribed to the delivery device. For more information, see Create New Users and Groups or Contacts and Contact Groups
-
-
Click Save.
Add a Delivery Address
-
Open the Workstation window with the Navigation pane in smart mode.
-
In the Navigation pane, click Users and Groups.
-
Click the Users or Contacts tab.
-
Right-click a user or contact and choose Edit.
-
In the left pane, click Deliveries or Delivery Addresses.
-
Click Add Address.
-
Expand the Type drop-down list and choose Google Cloud Storage.
-
Expand the Delivery Device drop-down list and choose the delivery device you created above.
-
In Name, type a name for the address.
-
In Address, type the target storage bucket name.
Find the bucket name in the Google Cloud command line or from the Google Cloud Console.
-
Click Save.
-
Optionally enter a User Comment and click OK.
Create a Google Cloud Storage Subscription
-
Open the Workstation window with the Navigation pane in smart mode.
-
In the Navigation pane, inside the Administration group, click
, next to Subscriptions. -
Choose an environment and project, then click Select.
-
In Name, enter a descriptive name for the subscription.
-
Expand the Type drop-down list and choose Google Cloud Storage.
- To add content to the subscription, click in the Content pane. Select up to six pieces of content to add to one subscription, including dashboards
- In the Content pane, click More
 next to each dashboard
 - Change the delivery format. Supported formats for dashboard attachments are PDF, Excel, and CSV files. Supported formats for reports are CSV, Excel, HTML, PDF, and plain text files.
The supported formats for documents are Excel, HTML, and PDF.
If you select CSV, define a range and select the delimiter character from the Delimiter drop-down list.
If you select Excel for a dashboard or report, define the range, contents, and filter options.
If you select Excel for a document, define a range.
If you select HTML, define a range.
If you select PDF for a dashboard, you can define PDF settings such as the range, page size, and showing page numbers. Click Settings
 to display the PDF Settings window. After you define the settings,
click Save to return to the subscription.
to display the PDF Settings window. After you define the settings,
click Save to return to the subscription.If you select PDF for a report or document, choose a range.
If you select Plain Text, select the delimiter character from the Delimiter drop-down list.
- To send the same content in different delivery formats, add the content multiple times and choose different delivery formats for each.
- To simulate subfolders inside a bucket, in File Name, enter a slash (/), type your subfolder name, then enter your file name. For example, to add a
TestReportOnelinefile to theSubscriptionsfolder, typeSubscriptions/TestReportOnelinein File Name.
-
Expand the Schedule drop-down list and choose existing schedules or click Add New Schedule. For information on creating schedules, see Create and Edit Schedules.
To only view schedules you own, toggle on Show my schedules only.
-
Once the schedule is set, you can optionally specify the date when the subscription should stop by selecting the date in Expire on and choose a Timezone, if available.
-
In Prefix Name, optionally type a new file name for your content. You can include macros, attributes, and metrics that dynamically change based on your parameters. To choose from a list of available macros, attributes, and metrics, type {& or {.
The / character will be present in the filename, rather than creating subfolders.
- In Delimiter, optionally type a symbol to identify the symbol used to separate text strings in the File Name. The following delimiters are not supported:
*,/,\,<,>,|,?, and". - In Google Cloud Storage locations from, choose from Buckets or Users.
- If you choose Buckets, expand the Subscription Device drop-down list and choose the device you created above. Expand the Buckets drop-down list and choose the buckets you want to use.
- If you choose Users, type a name or click Add User, select a user, and click Update.
- You can optionally select to enable sending notifications to the user's email.
- To run the subscription as soon as you save, select the check box next to Run the subscription immediately after saving.
- Click Save.